


If you’ve ever asked, “Where is that machine?”, “Is it being used?”, or “Why did we lose half a day waiting on equipment?”, you’re already feeling the pain that construction equipment telematics is built to solve.
This guide is written in plain language and set up like a manual. It shows how to roll out construction equipment telematics using Trackunit’s products and pages as the backbone of the solution, without turning your rollout into a long, drawn-out science project.
Trackunit’s overall goal is straightforward: connect fleets, sites, and equipment through telematics and data connectivity so you can see what’s happening and reduce downtime.
Construction equipment telematics is simply equipment data collected automatically and sent to software where you can act on it.
In construction, that usually includes:
When people say construction telematics, they often mean the same thing, but across more of the jobsite ecosystem: machines, attachments, small tools, depots, service operations, and even operator workflows.
At Trackunit, we frame this as connecting everything from heavy equipment to small assets into one view and one workflow, so you spend less time guessing and more time dispatching, billing, scheduling, and recovering assets.
Before you pick devices or dashboards, define what good looks like. Most construction equipment telematics rollouts aim for a few practical outcomes:
You want a live view where someone can answer:
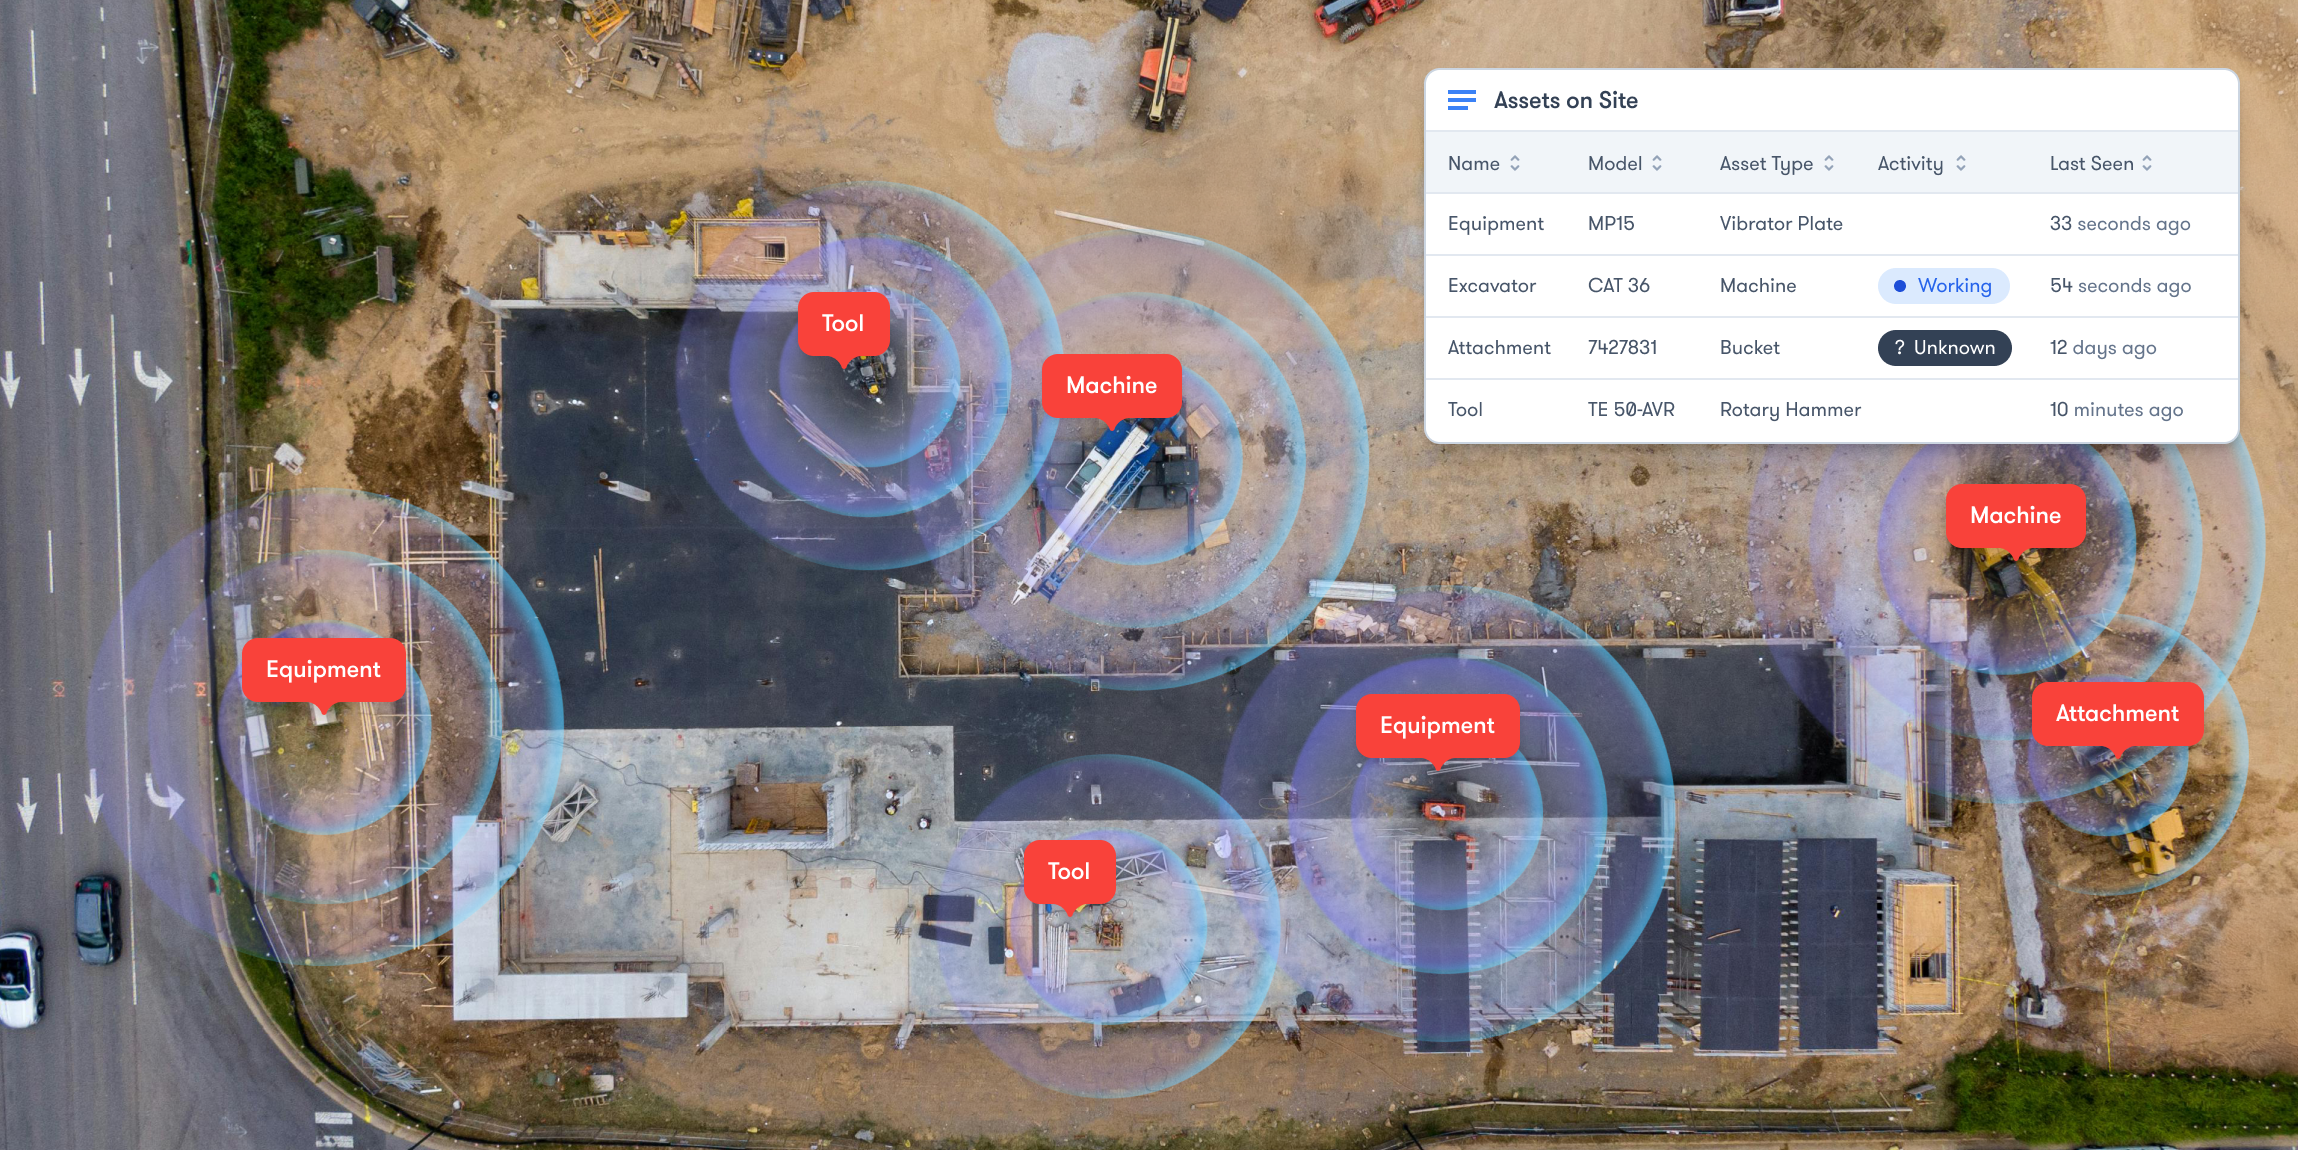
Trackunit Sites and location visibility are designed around this daily reality of near real-time site dashboards and boundaries you can define (or optionally automatically detect) so teams aren’t calling around.
The fastest ROI is usually moving underused machines to where they’re needed, effectively right-sizing your fleet, instead of renting/buying more.
Trackunit’s Utilization app is explicitly built to help you identify unused assets, right-size by asset type, relocate under-utilized assets, and avoid over-utilization that leads to breakdowns.
Telematics becomes valuable when it changes behavior:
Trackunit describes this as combining engine hours, fault codes, and other signals in one view so you can prioritize which assets need attention first, across mixed fleets.
A device alone doesn’t prevent theft. It’s the combination of:
Trackunit’s theft content emphasizes layering site-based and movement-based alerts for better coverage.
Once you have connected assets, you can add operator controls and inspection workflows.
Trackunit’s Access Management solution is designed to “grant access only to trained operators,” enforce inspections, and secure usage with encrypted, unsharable credentials.
Think of construction equipment telematics as a layered system. Trackunit offers multiple layers so you can start fast and expand.
Trackunit Manager is positioned as a fleet management solution purpose-built for construction, connecting mixed-fleet data in one place so you can act on it.
Inside Trackunit Manager, the core “action” areas you’ll use most in a telematics rollout are:
A big mistake in construction telematics is waiting until “every machine has a box installed.”
Trackunit Data Feeds are explicitly described as a way to connect equipment fitted with OEM branded and/or third party telematics service provider platforms, managing mixed fleets from one platform, and getting visibility quickly.
Trackunit also maintains a broad range of OEM integrations to support mixed fleet connectivity in one platform.
Practical takeaway: Start your rollout with what is already connected (manufacturer telematics), then “fill gaps” with Trackunit IoT devices where needed.
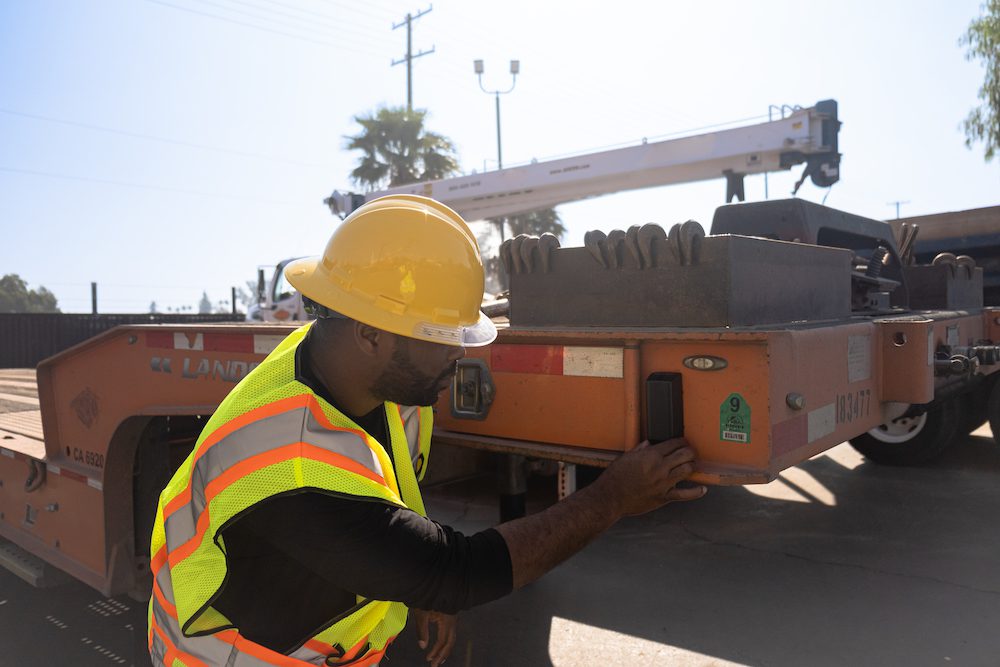
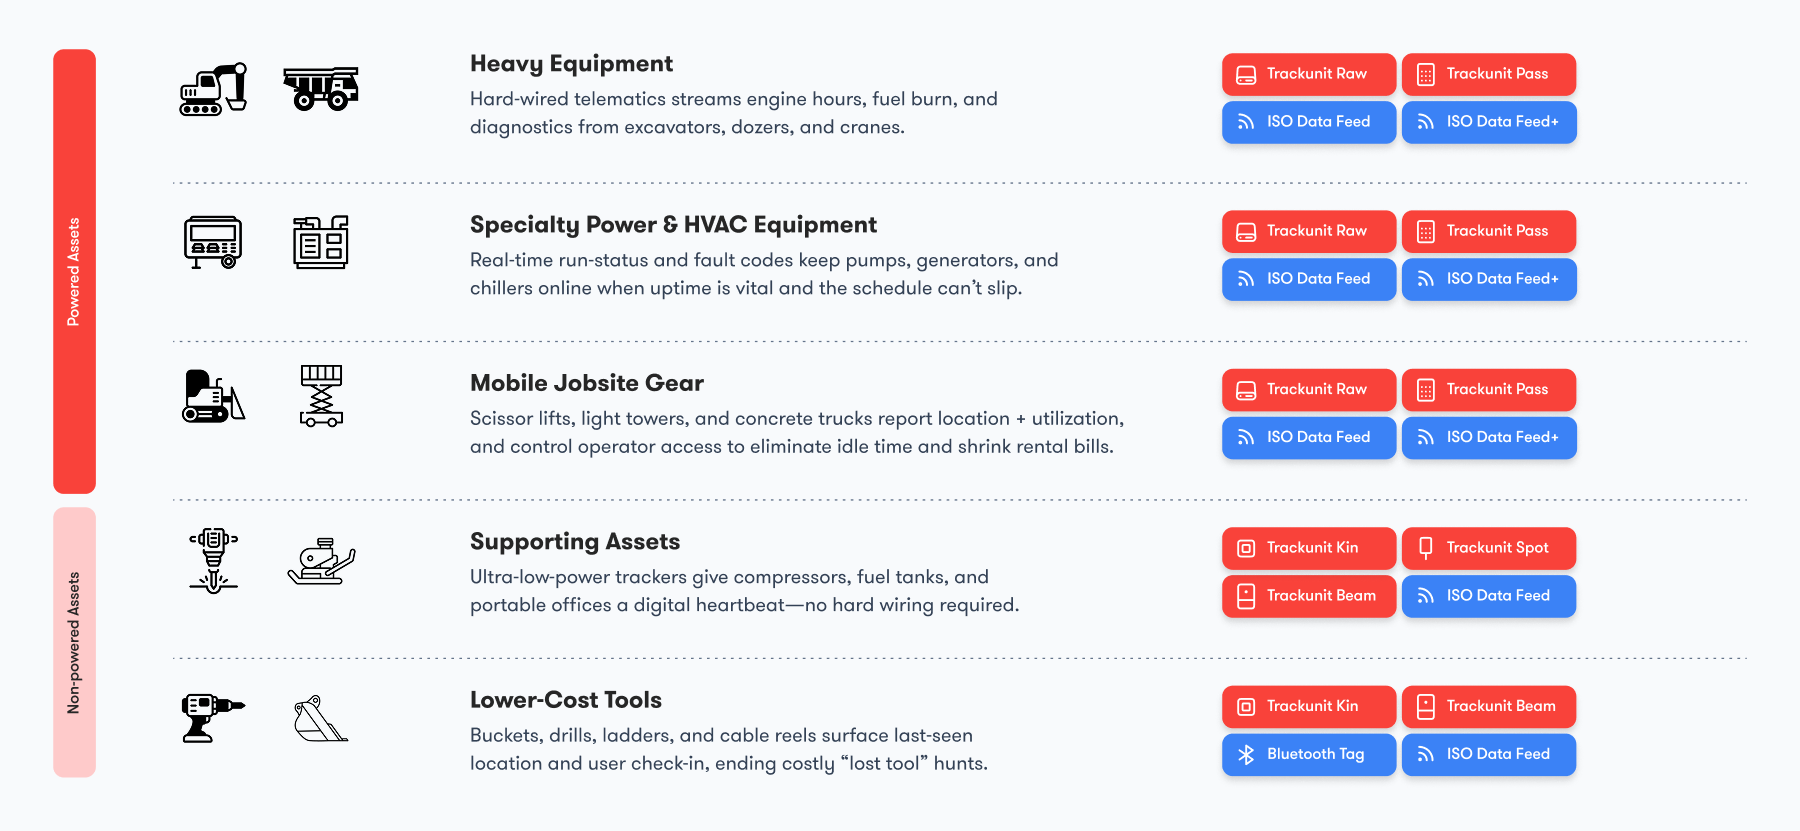
For powered equipment (yellow iron, lifts, generators, etc.), Trackunit Raw is the rugged telematics device layer.
Trackunit describes Raw as a rugged LTE-M telematics device delivering near real-time location, utilization, and condition data from heavy equipment.
Attachments and non-powered assets are where most telematics programs have blind spots.
Trackunit Spot is positioned to add non-powered equipment to the same platform, track equipment/attachments alongside the rest of your fleet, and complete a one-time installation in a few minutes.
For tools and small assets, Trackunit’s approach is Bluetooth-based jobsite visibility:
Telematics is only useful when it’s working. Trackunit provides tooling to diagnose connectivity and installation issues:
If your construction telematics program includes operator controls:
This is the part most teams want: what to do first, what to set up, and how to avoid messy rollouts.
Choose one pilot that represents your real world:
The goal is to test your full construction equipment telematics workflow: locate → utilization → alerts → reporting → maintenance response.
Tip: If your leadership wants speed, start with Data Feeds for quick visibility and add devices later.
Before you connect anything, build a “minimum viable asset register”.
For each asset, you need the following:
This is also where you decide naming conventions (e.g., EXC-210 | CAT 320 | Yard A).
Why this matters: Construction telematics data is only useful when humans can find the right asset quickly.
Start with your “low effort/high coverage” move:
Trackunit describes Data Feeds as a fast way to track key metrics like engine hours, location, and fuel use without touching the machine.
Where to loop back:
Now decide where hardware adds real value.
Use this simple rule:
This is what “complete construction equipment telematics” really means: the machines and the stuff that disappears between machines.
5 a) Raw installation basics (powered equipment)
Follow Trackunit’s guidance for installation conditions (signal and mounting orientation).
Then validate:
Important safety note: If you’re working with CAN data/profiles, Trackunit warns to apply CAN profiles only under guidance because incorrect profiles may affect data quality and, in rare cases, machine behavior.
5 b) Spot activation basics (non-powered assets)
Spot won’t begin sending data until activated (to preserve battery during shipping/storage), and provides step-by-step activation/installation instructions.
5 c) Kin setup basics (tools and small assets)
Trackunit’s Kin page describes a simple process: mount, activate (peel sticker), onboard using Trackunit Go, then it connects via the Trackunit Bluetooth network.
For detailed guidance, you can go here for help-center steps for installing/activating/onboarding Kin tags.
5 d) Beam gateways (when GPS won’t cut it)
If you have indoor storage, containers, basements, or a tool depot, Beam is designed to capture visibility “anywhere on your site” and remove blind spots.
And if a Beam gateway is installed where GPS is weak, Trackunit documents a “manual location/pinning” process in Trackunit Manager.
In construction telematics, “location” is only half the story. You need site context:
Trackunit’s Sites in Manager is designed to give an up-to-the-minute view of asset location, with dashboards and the option for automatic site detection or manually defined boundaries.
Simple Sites setup checklist:
Where to loop back:
Now make the data operational.
Trackunit’s Utilization app is built to help you:
A simple weekly utilization routine (30 minutes):
This is one of the fastest ways construction equipment telematics pays off: fewer “unplanned rentals” because you already own idle equipment.
Alerts should reduce work, not create noise.
Start with these three categories:
8 a) Operational alerts (health signals)
Trackunit documents Operational Alerts for fuel level, battery voltage, DEF tank level, and ambient air temperature, where supported by the asset or data source,including a step-by-step setup flow inside Trackunit Manager.
Use operational alerts for:
8 b) Site-based theft alerts
Trackunit provides site-based theft alerts to notify you when assets move outside a site boundary (geofence), helping prevent unauthorized use or theft.
8 c) Movement-based theft alerts
Movement-based theft alerts focus on movement outside assigned working hours beyond a specified boundary.
Best practice: layer site-based & movement-based alerts for stronger coverage.
Construction telematics wins when you can prove what happened. Trackunit’s Reports are described as supporting billing, internal compliance processes, and maintenance decisions, and include report types tailored to business needs like monitoring usage or recovery of stolen assets. help.trackunit.com
Practical“starter” report pack:
If you want construction telematics to extend beyond “dots on a map,” this is where you go next.
10 a) Access Management (controlled operation)
Trackunit positions Access Management as a way to digitally manage access rights according to your training/safety policies, grant access only to trained operators, enforce inspections, and secure usage with encrypted credentials.
10 b) Inspections (field workflow using Go + On)
Trackunit’s inspection workflow ties together:
This matters because a lot of “downtime” starts as a small defect that no one reports early.
If you do nothing else, build your rollout around these repeatable workflows.
Goal: identify what needs attention before crews are waiting.

Goal: keep the fleet balanced and reduce rentals.
Goal: detect early and respond consistently.
Goal: service by usage and health, not just calendars.
Trackunit describes combining engine hours, fault events, service history, and usage-based upcoming maintenance to plan work orders and site visits.
Mistake 1: Starting with IoT devices only
Fix: start with Trackunit Data Feeds to get immediate visibility, then add devices where feeds don’t cover.
Mistake 2: No naming standards
Fix: decide asset naming conventions and enforce them during onboarding (especially if multiple people add assets in the field).
Mistake 3: Alert overload
Fix: start with a small number of high-value alerts (fuel/battery & theft). Expand after the team trusts the system.
Mistake 4: Not monitoring telematics health
Fix: use My Network and Verify to confirm data uptime, troubleshoot, and stabilize your telematics program.
Yes—Trackunit Data Feeds are positioned specifically as “no hardware required” to start, leveraging OEM feeds so data flows into Trackunit Manager quickly.
That’s typically where Trackunit Spot fits: it’s designed for non-powered assets, giving location and insight alongside the rest of the fleet.
Trackunit’s model is Kin tags + the Trackunit Bluetooth network, with Beam gateways used to extend coverage in blind spots like buildings, containers, and depots.
Trackunit Verify is documented as a tool to confirm installation and review signals like last data, GPS/mobile signal, voltages, and inputs.
The best construction equipment telematics programs aren’t the ones with the most devices. They’re the ones with:
That’s the difference between “we bought construction telematics” and “construction equipment telematics changed how we run jobsites.”
Want to read more? Here’s everything you need to know about fleet utilization